

Traditional SEO was built on a simple premise: a web server sends a complete HTML text file to a browser, and search engine crawlers read that text line by line. If your keywords, title tags, and links were inside that HTML file, Google indexed them almost instantly.
However, modern websites rarely operate this way. Today’s web relies heavily on JavaScript (JS) frameworks like React, Next.js, Vue, and Angular. Instead of serving pre-built text, servers often send a bare-bones code shell, relying on the user’s browser (or Googlebot) to execute JavaScript code and generate the actual text, images, and links on the fly.
This fundamental shift created JavaScript SEO: the practice of ensuring search engine crawlers can successfully parse, execute, render, and index dynamic, JavaScript-powered web applications without dropping critical content or wasting crawl budget.
In this guide, you will learn:
- How Googlebot processes dynamic code through its 3-stage crawling and rendering pipeline.
- The fundamental difference between Raw HTML (View Source) and the Rendered DOM (Inspect Element).
- How Google resolves conflicts when raw code and JavaScript-injected directives clash.
- Practical fixes for JavaScript link traps, client-side routing errors, and lazy-loading indexation bugs.
- Why companies are migrating away from traditional CMS platforms to modern JavaScript frameworks
- How to use Chrome DevTools, GSC, and crawlers to audit JavaScript SEO at scale.
What is JavaScript SEO and Why Traditional SEO Rules Fail on Dynamic Sites?
If you treat a modern JavaScript-driven application like a traditional static website, critical parts of your site may become completely invisible to search engines. Traditional SEO tactics assume that what you write in your content management system (CMS) is immediately visible inside the raw source code. With dynamic web apps, that assumption breaks down.
Static HTML vs. Dynamic JavaScript: Understanding the Difference in Simple Terms
To understand why traditional SEO rules fall short, think of the difference between buying a pre-cooked meal and ordering a meal kit:
- Static HTML (The Pre-cooked Meal): When a crawler requests a traditional static page, the server sends fully cooked HTML. Everything: headings, paragraphs, images, and links, is ready to consume immediately. The crawler opens the file, reads the text, and leaves.
- Dynamic JavaScript (The Meal Kit): When a crawler requests a JavaScript-heavy page, the server sends a box of raw ingredients (a lightweight HTML shell alongside
.jsscript files). For the page to actually exist, someone has to follow the recipe and execute the scripts to construct the final text and visuals.
If a search crawler only inspects the raw ingredients (the initial code response) without actually cooking the meal (executing the JavaScript), it sees an empty page.
Static HTML VS Dynamic Javascript | |
Traditional Static HTML | Dynamic JavaScript |
Server delivers final text | Server delivers empty HTML shell |
Content available instantly | Content created in browser via JS |
Crawler reads raw code | Crawler must run rendering engine |
Zero processing delay | Heavy CPU & memory processing load |
The 3-Step Googlebot Pipeline: How Crawling, Rendering, and Indexing Actually Work Today
Google doesn’t process JavaScript pages in a single quick pass. Instead, Googlebot routes dynamic pages through a specialized three-stage processing pipeline:
- Crawl (Fetching the Raw Code): Googlebot sends an HTTP request to your server. It downloads the initial raw HTML file and any immediately visible links. If your site relies on pure client-side JavaScript to insert links, Googlebot will not see those links during this initial fetch.
- Render (Executing the Code via WRS): Googlebot passes the page to Google’s Web Rendering Service (WRS), which uses a modern headless Chrome browser instance. The WRS downloads your CSS files, fetches external API data, and executes your JavaScript bundles to assemble the final Rendered DOM (Document Object Model).
- Index (Parsing the Final Page): Once rendering is finished, Googlebot extracts the fully generated text, metadata, and dynamically inserted internal links from the rendered DOM, sending that structured data to Google’s main search index.
The “Two-Waves of Indexing” Myth: How Fast Does Google Really Process JavaScript?
For years, the SEO industry talked about the “Two Waves of Indexing.” The belief was that Google indexed raw text in “Wave 1” immediately, and then returned weeks or months later in “Wave 2” to render the JavaScript when extra server resources became available.
The Modern Reality: While Google does separate raw crawling from full rendering into two stages, the delay between Crawling and Rendering is no longer weeks, it usually happens within seconds, minutes, or hours.
However, calling it “instant” is also dangerous. Because rendering millions of JavaScript pages consumes massive cloud computing power and CPU cycles, Googlebot manages its rendering resources strictly:
- If your JavaScript files are extremely heavy, take long to execute, or crash the browser thread, Googlebot may defer rendering.
- If your server responds slowly (high Time to First Byte / TTFB), Googlebot may deprioritize rendering your dynamic pages to conserve resources.
This means that while the “Two Waves” myth as a rigid timeframe is dead, rendering deferral is real. If your JavaScript execution is unoptimized, your newly published content or updated prices can sit unindexed in a processing queue while your competitors outrank you.
Raw HTML vs. Rendered DOM: The Core Rule of JavaScript SEO
To master JavaScript SEO, you must understand a fundamental distinction: what your server sends in the initial response is rarely what search engines analyze. The code sent by the web server is merely the starting line; the code assembled by the browser after executing JavaScript is the finish line.
If you don’t evaluate both stages, you will miss the exact technical disconnects that cause indexation failures.
Raw HTML vs. Rendered DOM: Why What You See in “View Source” Isn’t What Google Indexes
In traditional web development, opening your web page and checking its code gave you a complete picture of what search engines indexed. In JavaScript-driven websites, relying on initial server code can be completely misleading.
View Source vs. Inspect Element: How to Spot Code Injected by JavaScript
- The easiest way to understand this distinction is by comparing two built-in browser tools:
- View Source (Raw HTML): When you right-click a webpage and select View Source, your browser displays the raw HTML payload returned directly from your web server. If your website is built on a client-side JavaScript framework (like React or Vue), “View Source” might only show a handful of lines—usually a
<div id="root"></div>tag alongside several<script>bundle tags. This is the un-rendered state. - Inspect Element (Rendered DOM): When you right-click an element and select Inspect, Chrome opens the Developer Tools to display the Document Object Model (DOM). The DOM represents the live, interactive tree of nodes constructed after the browser fetched external APIs, executed JavaScript bundles, and injected dynamic text, images, and HTML nodes into the page layout. This is the rendered state.
Raw HTML VS Rendered DOM | |
View Page Source (Raw HTML) | Inspect Element (Rendered DOM) |
What the server delivers | What the browser/WRS builds |
Initial HTTP response text | Fully constructed object model (DOM) |
Missing client-side scripts | Contains JS-injected elements & text |
Checked via cURL / raw fetch | Checked via Live Test in GSC / Chrome |
Googlebot’s Web Rendering Service (WRS) evaluates the Rendered DOM to rank your content. If key text or structured data exists in your CMS but fails to render into the final DOM tree, Google treats that content as non-existent.
The Strict Override Rule: What Happens When Raw HTML and Rendered DOM Conflict?
One of the most dangerous edge cases in JavaScript SEO occurs when your server’s initial Raw HTML contradicts your client-side Rendered DOM.
For instance, consider a scenario where your back-end CMS sends a default metadata directive in the raw code, but your front-end framework overwrites it dynamically via JavaScript:
- Raw HTML:
<meta name="robots" content="noindex, follow"> - Rendered DOM (via JS):
<meta name="robots" content="index, follow">
How does Googlebot handle this conflict? Google follows the stricter rule.
Because Googlebot processes the initial raw HTML first, if it encounters a noindex tag in the Raw HTML, it may abort the rendering process entirely to save computing resources. The Web Rendering Service (WRS) will never execute the JavaScript required to swap the tag to index. The page remains excluded from Google’s database.
Conversely, if your Raw HTML says index, but your client-side JavaScript accidentally injects a noindex tag during page hydration or state changes, Google will discover the noindex tag during the rendering phase and remove the page from search results.
The Golden Rule: Never serve contradictory meta directives, canonical URLs, or structured data between your raw initial response and your rendered JavaScript output. Always aim for 100% state consistency.
Heavy Caching Secrets: Why Googlebot Reuses Your JavaScript Files to Save Time
Rendering millions of dynamic pages every minute requires an immense amount of server bandwidth and computing power. To minimize resource consumption, Googlebot employs an aggressive caching strategy for external static assets—especially JavaScript (.js) and CSS (.css) stylesheets.
Unlike a human visitor whose browser re-checks asset freshness periodically, Googlebot caches JavaScript files aggressively for extended periods. It will frequently ignore standard HTTP cache headers like Cache-Control: max-age=3600 if it suspects the script file hasn’t changed.
The Risk of Un-versioned JavaScript Bundles
If your developer updates site functionality or main content layouts inside app.js and deploys it to the server without changing the file name, Googlebot might continue using its cached, legacy version of app.js for days or weeks.
This causes Googlebot to render your pages using outdated logic, breaking dynamic components or missing newly added content elements.
The Fix: Cache Busting via File Hashing
To force Googlebot to fetch your newly updated JavaScript immediately, your build pipeline (Webpack, Vite, Rollup, Next.js) must use cache busting via hash fingerprints in asset URLs:
- Un-versioned (High Risk):
https://example.com/assets/bundle.js - Versioned Hash (Safe):
https://example.com/assets/bundle.a8f9c2d1.js
When you release a new codebase build, the hash fingerprint changes automatically. Googlebot detects the modified file path as a completely new resource, fetches it without delay, and executes your latest JavaScript code.
Technical Directives & Metadata Injected via JavaScript
Modern JavaScript applications often manage page titles, descriptions, canonical links, and structured data dynamically via client-side routing. While this makes building single-page applications easier for developers, it introduces severe SEO risks if not handled correctly.
Because search engines rely on these technical signals to understand and rank your content, injecting them incorrectly through JavaScript can lead to indexing failures, duplicate content penalties, or completely unread schema markup.
Injecting Meta Tags, Canonicals, and Schema Using JavaScript
When a developer uses a framework like React, Vue, or Angular, meta tags are frequently updated on the fly as users navigate between views. However, search engine crawlers do not browse websites like human users. Understanding how Google’s rendering engine processes these dynamic injections is crucial for protecting your organic visibility.
Title Tags and Meta Descriptions: Does Google Accept Tags Added by JavaScript?
The short answer is yes, Googlebot can read and process title tags and meta descriptions injected via JavaScript (using libraries like React Helmet or framework-native document head managers).
Once the Web Rendering Service (WRS) executes your JavaScript and builds the DOM, it reads the finalized <title> and <meta name="description"> tags from the rendered head section.
The Hidden Trap: Latency and Rendering Queues
Even though Google can read JS-injected titles, relying entirely on client-side JavaScript for critical SEO metadata introduces unnecessary risk:
- The Indexing Delay: If your server initially sends a generic default title (like “Loading…”) and your JavaScript updates it a second later, Googlebot might occasionally index the fallback placeholder text if it captures a snapshot before rendering finishes.
- Core Web Vitals & Visual Stability: Delayed title updates can create jarring shifts in browser tabs or cause search snippets to temporarily show unoptimized fallback text.
Best Practice: Always render your primary Title and Meta Description directly in the Initial Server Response (Raw HTML) whenever possible. Use JavaScript injections only for secondary or user-specific dynamic modifications.
The Robots Directive Trap: Why Adding “noindex” via JavaScript Often Fails Completely
One of the most dangerous mistakes in JavaScript SEO is attempting to block search engines from indexing a page by injecting a noindex meta tag via client-side scripts.
For example, if your application determines a page should be private and runs a script to append <meta name="robots" content="noindex"> into the DOM, it will frequently fail.
Why It Fails
- The Crawl Phase Happens First: When Googlebot initially crawls your URL, it reads the Raw HTML sent by the server. If the server says nothing (or sends an
indexdirective), Googlebot registers the page as indexable and adds it to the rendering queue. - Rendering Bottlenecks: Because rendering is resource-intensive, Googlebot does not render every single page immediately. If a page with a JS-injected
noindexsits in the rendering queue for days, Google may crawl and index the raw, accessible version before the WRS ever executes the JavaScript containing thenoindextag.
As a result, private or thin pages can accidentally leak into Google’s search index. If you need to keep a page out of search results, always return a server-level HTTP header (X-Robots-Tag: noindex) or a static raw HTML meta tag rather than relying on JavaScript.
Canonical Links: How to Safely Append Canonical Tags Without Causing Duplication Errors
Canonical tags tell Google which version of a URL is the master copy, preventing duplicate content issues across similar pages.
When appending canonical URLs via JavaScript, you must follow strict implementation guidelines to prevent indexing chaos:
- Single Canonical Rule: Ensure your JavaScript framework only injects one
<link rel="canonical" href="...">tag into the document head. If a slow-loading script or plugin injects a fallback canonical first and then replaces it with another, Googlebot may get confused and ignore both. - Match the Rendered URL: The URL specified in your JS-injected canonical must match the final, accessible URL in the browser bar (including correct trailing slashes and HTTP/HTTPS protocols).
- Server-Side Preference: Just like meta robots tags, server-rendered canonical links in the initial HTML are always processed faster and more reliably than those injected by client-side JavaScript.
Structured Data (JSON-LD): How to Inject Schema Markup Dynamically with JavaScript
Structured data (like Product schema, Article schema, or FAQ schema) helps Google display rich snippets in search results. Fortunately, Googlebot fully supports JSON-LD structured data injected via JavaScript, provided it is rendered correctly in the DOM.
However, debugging dynamic schema requires a different approach than static HTML:
- Don’t Use “View Source”: If you check “View Source” on a page with JS-injected JSON-LD, you won’t see the script block. You must use Inspect Element to verify that the
<script type="application/ld+json">block exists inside the rendered DOM. - Use the Rich Results Test Properly: Never test a URL by pasting its raw source code into Google’s Rich Results Test tool. Always use the URL Inspection tab in the tool, which fetches the live, fully rendered DOM from Google’s rendering pipeline. If the Rich Results Test successfully parses your dynamic schema, Googlebot is reading it correctly.
JavaScript Links, Routing, and Lazy Loading Traps
The primary way search engine crawlers discover new pages on your website is by following internal links. In traditional websites, links are standard HTML elements that crawlers can extract in milliseconds.
In modern JavaScript applications, developers often create interactive elements using custom scripts, click handlers, or hash-based routing. If your JavaScript framework replaces native web standards with custom code, you risk severing your website’s crawl paths entirely.
How to Make JavaScript Links, Buttons, and Images Crawlable for Google
To keep your content discoverable, you must ensure that your front-end code adheres to web standards that search engines can easily parse.
Crawlable Links: Why Googlebot Ignores Buttons, onClick Events, and Fake Links
Googlebot is designed to extract links automatically from your web pages. However, Googlebot does not click on elements like a human user. It reads the DOM, looks specifically for HTML link tags, and extracts the target destination string.
The Fatal JavaScript Link Trap
If your developer builds internal navigation using custom JavaScript click events on non-link elements, Googlebot will completely miss those crawl paths:
- Uncrawlable (Button Event):
<button onclick="goToPage('/products')">View Products</button> - Uncrawlable (Missing Href):
<a onclick="navigate()">View Products</a> - Uncrawlable (JavaScript Void):
<a href="javascript:void(0)">View Products</a> - Uncrawlable (Span Trigger):
<span class="link" data-url="/products">View Products</span>
In all the negative examples above, a human user can click and navigate, but Googlebot will see a dead end. It will not execute the click handler to figure out where the page goes.
The Golden Rule of Crawlable Links
To ensure Googlebot can find and crawl every page on your site, every internal link must be a native HTML <a> tag with a valid href attribute containing a absolute or relative URL path:
- 100% Crawlable:
<a href="/products/blue-widget">View Blue Widget</a>
You can still attach custom JavaScript functionality to standard <a> tags for interactive UI animations, just make sure the native href destination is explicitly present in the DOM for search bots to extract.
Clean URL Routing: Why You Should Use History API Instead of Hash (/#/) URLs
Single Page Applications (SPAs) often manage navigation dynamically without triggering a full page refresh. However, the mechanism used to handle client-side routing determines whether search engines can index individual views.
The Hash Routing Anti-Pattern (/#/)
Early SPA setups relied on URL hashes to change page views without refreshing: https://example.com/#/about or https://example.com/#/services.
According to official web standards, search engines treat everything after the # symbol as an internal page fragment identifier (like jumping to an anchor on the same page). Googlebot ignores hash parameters when discovering new URLs. To Google, https://example.com/#/about and https://example.com/#/services are identical to the root URL example.com.
The Modern Solution: HTML5 History API (pushState)
Modern JavaScript frameworks (React Router, Vue Router, Next.js) allow you to use the HTML5 History API for seamless navigation:
- Clean & Indexable:
https://example.com/about - Clean & Indexable:
https://example.com/services
Using window.history.pushState() updates the URL in the browser bar to a clean, unique path while allowing your JavaScript to load content dynamically in the background. Googlebot treats every clean URL path as an independent, fully indexable web page.
Soft 404 Errors in Single Page Apps: Telling Google When a Page Doesn’t Exist
In traditional web servers, if a user requests a page that doesn’t exist (https://example.com/deleted-page), the server returns an explicit HTTP status code 404 (Not Found).
In client-side Single Page Applications, the web server serves the exact same index.html file (HTTP status 200 OK) for every URL path, relying on JavaScript in the browser to display a “Page Not Found” screen.
Server 404 VS Client-Side Soft 404 | |
Traditional Web Server | Unoptimized Single Page App (SPA) |
URL requested: /missing-page | URL requested: /missing-page |
Server sends HTTP 404 Code | Server sends HTTP 200 OK + index.html |
Googlebot drops URL instantly | JS displays “404 Page Not Found” text |
Zero indexation waste | Googlebot indexed it as a Soft 404 |
This creates a Soft 404 error. Googlebot sees an HTTP 200 OK status code, but when it renders the DOM, it finds text that says “Sorry, this page doesn’t exist.” Google flags this as a configuration error, which wastes crawl budget and damages site quality signals.
How to Fix SPA Soft 404 Errors
- Server-Side Catch: If possible, configure your origin server or edge server to return a true HTTP status code 404 whenever a requested URL route is invalid.
- JavaScript Meta Redirect: If returning a 404 status code from the server is architecturally impossible in your SPA setup, use client-side JavaScript to inject a standard meta robots directive into the DOM when a route fails:
<meta name="robots" content="noindex"> - Client-Side Redirect: Redirect invalid routes to an explicit server-backed
/404error URL that naturally serves a true 404 HTTP header.
Lazy Loading Images and Content: How to Speed Up Pages Without Hiding Text from Search Bots
Lazy loading is an essential performance optimization that postpones the loading of off-screen images and heavy text blocks until the user scrolls down to them. However, if implemented improperly via custom scripts, lazy loading can completely hide critical content from search bots.
Why Custom Scroll Listeners Fail
If your lazy loading script relies on manual scroll events (like window.addEventListener('scroll')) or user touch triggers to load content into the DOM, Googlebot will never see that content. Googlebot’s Web Rendering Service (WRS) resizes its headless viewport to render the page, but it does not physically scroll down your site like a human user.
How to Implement SEO-Safe Lazy Loading
To ensure search engines can index lazy-loaded content, images, and infinite-scroll feeds:
- Use Native Browser Lazy Loading: For images and iFrames, always prefer native HTML attributes. Search engines support native lazy loading out of the box without requiring any complex JavaScript execution:
<img src="photo.jpg" loading="lazy" alt="Descriptive text"> - Use the Intersection Observer API: If you are lazy loading text nodes, product cards, or infinite scroll pages via JavaScript, use the browser’s built-in
IntersectionObserverAPI. Googlebot supportsIntersectionObserverduring its rendering pass and will execute the callbacks to load the full DOM content. - Provide Fallback
<noscript>Tags or Static Links: For infinite scroll blogs or product paginations, always provide traditional paginated links (<a href="/page/2">) at the bottom of the raw HTML so crawlers can easily navigate to deeper pages without executing script triggers.
Why Companies Are Moving from CMS Platforms to Javascript Backed Platforms?
In recent years, a massive wave has hit the web development industry. Companies and scaling tech platforms are migrating away from traditional monolithic CMS platforms (like standard WordPress) and shifting their front-ends to modern JavaScript frameworks like Next.js.
The motivation is obvious: developers want lightning-fast performance, elite Core Web Vitals, and the powerful modularity of React. To keep things familiar for marketing teams, developers often build a decoupled or “headless” setup, keeping a custom dashboard or WordPress admin panel in the back-end to manage content, while Next.js handles the front-end delivery.
While this architecture can be an absolute powerhouse for SEO when done right, it introduces severe, silent indexing traps if the engineering team ignores search engine constraints.
CMS to Javascript: Where SEO Gets Complicated
When a site transitions from standard WordPress to a Next.js-powered architecture with custom API integrations, the fundamental way content travels from database to browser changes completely.
The Traditional WordPress Way vs. The Headless Next.js Way
- Traditional WordPress: The PHP backend queries the MySQL database, compiles the HTML template, and serves a complete, static text file directly to the browser or crawler. Everything lives in one place.
- Headless Next.js: The database feeds content through an API (GraphQL or REST). When a user or Googlebot requests a page, the Next.js server (running on Node.js or Edge infrastructure) fetches that data via API, compiles the React components into HTML on the fly, and serves it.
When built properly, Next.js delivers incredible speed. But when developers build custom APIs or dashboards without SEO coordination, major failures occur.
The 4 Major SEO Hazards in Next.js Migrations
If you are auditing or managing a site that recently moved from WordPress to Next.js, watch out for these four critical failure points:
1. The API Timeout & Silent Soft 404 Trap
In a headless setup, your Next.js frontend relies entirely on backend APIs to fetch article text, product details, and metadata.
- The Failure: If the backend API times out, crashes, or fails to respond instantly when Googlebot visits, what does Next.js render? Often, instead of returning a proper HTTP 500 error, the page renders successfully with an empty title, blank body text, and an HTTP 200 OK status code.
- The SEO Impact: Googlebot crawls a page, sees zero content wrapped in a 200 OK status, and flags it as a Soft 404. Your indexed pages instantly drop out of search results.
2. Broken URL Parity and Redirect Chains
When moving from WordPress to Next.js, developers often change routing logic.
- The Failure: WordPress naturally handles trailing slashes (e.g.,
/blog-post/) and category structures in a specific way. If your Next.js router handles slugs differently (dropping trailing slashes or altering lowercase/uppercase paths), legacy internal links will break. - The SEO Impact: If old URLs return 404 errors or trigger multi-hop 301 redirect chains instead of mapping directly to the new Next.js routes, Googlebot wastes massive crawl budget trying to find your content.
3. Missing SEO Meta Tags in Custom Dashboards
Developers building custom WordPress-like admin dashboards often focus entirely on text fields like body content and featured images, forgetting metadata fields.
- The Failure: If the custom API schema fails to pass SEO fields (Title tags, Meta descriptions, OpenGraph tags, Canonical URLs) into the Next.js props, the front-end defaults to generic hardcoded fallbacks across thousands of pages.
- The SEO Impact: Your entire product or blog catalog suddenly shares the exact same fallback title tag, destroying keyword targeting and triggering severe duplicate content penalties.
4. Client-Side Fetching Instead of Server-Side Rendering (SSR)
Some development teams write Next.js components using standard client-side hooks (useEffect with fetch()) rather than Server Components or Server-Side Rendering (getServerSideProps / App Router async server functions).
- The Failure: When Googlebot requests the page, the server sends an empty HTML shell, forcing Googlebot’s WRS to wait for client-side JavaScript execution to fetch the API data.
- The SEO Impact: Indexation slows down dramatically, and search snippets display unoptimized placeholders.
How to Protect SEO During a Next.js Migration
If your site has transitioned or is transitioning to Next.js with a custom or headless backend, enforce these non-negotiable rules with your development team:
- Mandate Server-Side Rendering (SSR) or ISR: Never rely on pure client-side API fetching for primary SEO pages. Ensure Next.js renders the full HTML markup directly on the server or edge before sending it to Googlebot.
- Implement Fallback Error Boundaries: Program your Next.js components to check if the API data is empty. If an API fails, the server must return an explicit HTTP 503 or 404 status code rather than outputting an empty 200 OK page.
- Strict URL Mapping Audit: Run a side-by-side crawl comparison using Screaming Frog between your old WordPress sitemap and your new Next.js site to verify 100% slug parity and clean 301 redirects.
- Expose All Meta Fields in the API: Ensure your custom dashboard UI includes dedicated inputs for Meta Titles, Descriptions, and Canonicals, and verify via “Inspect Element” that Next.js successfully injects them into the server-rendered
<head>section.
Diagnostic Tools & Finding JavaScript SEO Errors
Fixing JavaScript SEO issues requires the right diagnostic tools. Because standard SEO crawlers and browser views often hide rendering failures, you must rely on specialized tools to compare raw server responses directly against fully rendered code.
By combining Google’s native testing tools, browser developer environments, and enterprise crawlers, you can quickly spot script timeouts, missing dynamic content, and indexation blockers.
How to Test, Debug, and Audit JavaScript SEO Issues
To locate and resolve rendering problems across your website, adopt a systematic testing protocol using three essential industry tools.
Google Search Console Inspection Tool: Comparing Live Test Screenshots vs. Indexed HTML
Google Search Console (GSC) offers the most accurate environment for testing JavaScript SEO because it uses the exact same Web Rendering Service (WRS) pipeline that indexes your live website.
When auditing a dynamic page in GSC, always execute both diagnostic views:
1. The Indexed Page View (What Google Bot Currently Has)
Inspect a URL in GSC to see its current status in Google’s database. Under Page Indexing, click View Crawled Page. Here you can inspect:
- HTML: The rendered HTML code Googlebot captured during its last visit.
- Text: The plain text content Googlebot extracted for ranking purposes.
- More Info: Server response HTTP status codes, page fetch logs, and missing resources.
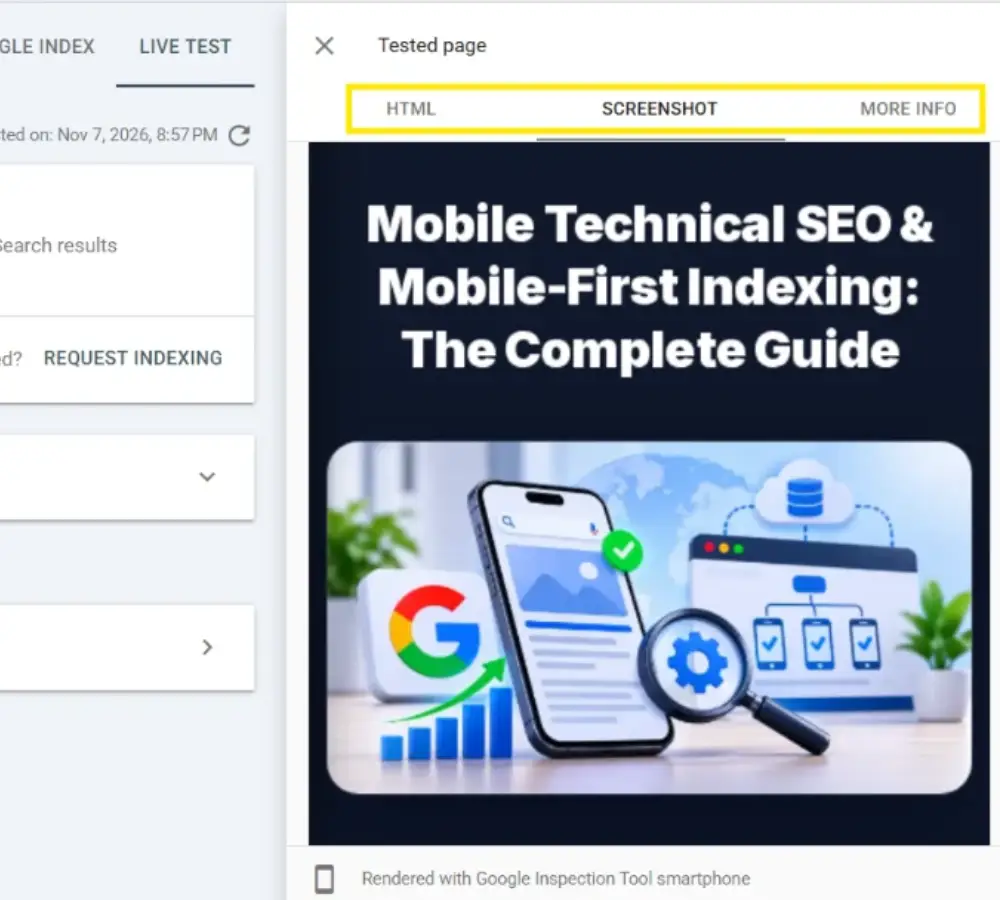
2. The Live Test (Real-Time Rendering Inspection)
Click Test Live URL at the top right of the interface. This forces Google’s WRS to fetch, execute, and render your page in real time. Once complete, click View Tested Page:
- Screenshot Tab: Check the visual screenshot to confirm if core layout sections, images, or client-rendered text blocks are visible. If the screenshot shows a blank white screen, a endless loading spinner, or missing content sections, your JavaScript bundle is timing out or throwing browser errors.
- HTML Tab: Search for critical keywords,
<meta>directives, or internal links in the code pane. If text appears on the visual screenshot but is missing from the HTML tab, Googlebot cannot parse that text for indexing. - Console Messages & Warnings: Check the log for blocked
.jsscripts, API network failures, or CORS (Cross-Origin Resource Sharing) restrictions that prevent your front-end framework from fetching data.
Chrome DevTools Tricks: Disabling JavaScript and Inspecting Rendered Code
You don’t always need to wait for crawler reports to spot basic rendering vulnerabilities. Google Chrome’s built-in DevTools lets you run quick on-page diagnostic tests directly inside your browser.
Trick 1: The “Disable JavaScript” Test
This is the fastest test to determine how heavily your website relies on client-side code:
- Open your webpage in Google Chrome.
- Press
F12(or Right-Click -> Inspect) to open DevTools. - Open the Command Menu by pressing
Ctrl + Shift + P(Windows) orCmd + Shift + P(Mac). - Type “Disable JavaScript” and hit Enter.
- Reload the webpage.
What to look for: Does your content remain visible, or does the screen turn completely blank? If the entire page vanishes, your site relies 100% on pure Client-Side Rendering (CSR). This means search engines must execute JavaScript to see anything on your domain.
Trick 2: Diffing Raw HTML vs. Rendered DOM
To compare raw initial HTML against live rendered HTML directly in your browser:
- Open DevTools and navigate to the Network tab.
- Reload the page and select the main document request (usually the first item at the top).
- View the Response tab—this shows the Raw HTML delivered by your web server.
- Now switch over to the main Elements tab in DevTools. This shows the live Rendered DOM.
- Compare the two. If vital internal links, schema code, or paragraph text exist in the Elements tab but are completely absent from the Response tab, those elements rely entirely on client-side JavaScript execution.
Screaming Frog JavaScript Rendering Mode: Finding Site-Wide JS Errors at Scale
Checking URLs one by one in DevTools or GSC is effective for manual debugging, but auditing an enterprise site with thousands of dynamic pages requires automation.
By default, SEO crawlers like Screaming Frog only fetch Raw HTML. However, you can configure Screaming Frog to emulate Google’s Web Rendering Service to uncover site-wide JavaScript failures.
Step-by-Step Setup:
- Open Screaming Frog and go to Configuration -> Spider -> Rendering.
- Change the rendering mode from Text Only to JavaScript.
- Adjust the Timeout setting (usually 5 to 10 seconds) to allow script bundles enough time to execute.
- Set the AJAX setting to fetch dynamic content triggers.
- Start your crawl.
What Screaming Frog Discovers in JS Mode:
- Missing Metadata at Scale: Spot pages where title tags or canonical links exist in raw code but get stripped or altered during JavaScript rendering.
- Console Error Logs: Export a site-wide report of JavaScript runtime exceptions (
Uncaught TypeError,ReferenceError) that break page execution for crawlers. - Blocked Script Resources: Identify
.jsor.cssfiles blocked by yourrobots.txtfile that prevent the crawler’s rendering engine from assembling page layouts correctly.
The SEO vs. Developer: Who Fixes Which JavaScript Issue?
Managing JavaScript SEO successfully in an enterprise or agency environment requires clear coordination between marketing, product, and engineering teams. Because JavaScript rendering errors involve complex front-end frameworks, server environments, and database APIs, SEO specialists cannot and should not try to fix code directly in production.
Instead, your role as an SEO lead is to diagnose exact technical bottlenecks, provide clear evidence from rendering tools, and hand over actionable tickets to your development team.
To ensure smooth deployments and prevent friction between departments, establish a strict division of labor. Knowing who owns what keeps your site secure and your engineering team aligned.
What the SEO Specialist Can Test and Verify Directly
As a technical SEO specialist, you have full ownership over auditing, validating, and monitoring how search engines perceive the site. Your daily responsibilities include:
- Rendering Audits: Using Google Search Console (Live Test vs. Indexed HTML), Chrome DevTools, and Screaming Frog JS mode to spot missing content, broken DOM elements, and execution timeouts.
- Metadata & Directives Verification: Inspecting raw server responses against rendered output to ensure title tags, meta descriptions, canonicals, and JSON-LD schema exist and match.
- URL Structure & Crawl Path Analysis: Checking that all internal navigation links use proper
<a href>attributes and auditing sitemap XML files for clean 200 OK URLs. - Issue Prioritization: Categorizing technical bugs by severity (e.g., distinguishing between a critical Soft 404 rendering failure and a minor missing alt tag) so developers tackle high-impact revenue blockers first.
When to Pass Diagnostic Tickets to Front-End Developers
Once you isolate a technical failure using diagnostic tools, you must translate your findings into precise, engineering-ready tickets. Never tell a developer “Fix my SEO”; instead, provide exact reproduction steps and architectural solutions.
1. Front-End Code & Component Issues (Pass to Front-End Devs)
- The Symptom: Internal navigation buttons are built using
onClickevents instead of native<a>href tags. - The Developer Ticket: “Update product category card components in
ProductGrid.tsxto wrap button elements or use native<NextLink href="...">tags so search crawlers can extract valid destination URLs.”
2. Rendering Strategy & Server-Side Adjustments (Pass to Full-Stack / DevOps Devs)
- The Symptom: A Next.js or React SPA page returns an empty HTML shell via client-side fetching (
useEffect), causing Googlebot to record Soft 404 errors. - The Developer Ticket: “Migrate static blog and product routes from Client-Side Rendering (
useEffectAPI calls) to Server-Side Rendering (SSR) or Incremental Static Regeneration (ISR) using async server components to ensure instant HTML delivery.”
3. API Failures & Error Handling (Pass to Back-End / API Devs)
- The Symptom: Backend APIs timeout when queried by the Next.js server, causing the front-end to render an empty page with an incorrect HTTP 200 OK status.
- The Developer Ticket: “Implement strict error boundaries in the Next.js API data fetching layer. If the CMS API times out, the server must return a proper HTTP 503 or 404 status code instead of a blank 200 OK page.”
4. Asset Caching & Build Pipeline (Pass to DevOps / Release Engineers)
- The Symptom: Googlebot is rendering pages using legacy JavaScript bundles because file names lack cache-busting hashes.
- The Developer Ticket: “Configure Webpack/Vite build pipelines to append content hash fingerprints (e.g.,
bundle.[contenthash].js) to all production asset outputs to ensure immediate cache invalidation upon deployment.”
Conclusion
Mastering JavaScript SEO is no longer optional if you want to compete in modern digital landscapes. As websites increasingly transition to dynamic frameworks like React, Vue, and Next.js, treating your codebase like a traditional static HTML site will lead to silent indexation drops, wasted crawl budgets, and lost revenue.
By understanding how Googlebot processes code through its 3-stage pipeline, maintaining strict parity between your raw server response and your rendered DOM, ensuring clean link architecture, and using the right diagnostic toolchain, you can build dynamic applications that rank effortlessly.
Is Your JavaScript Site Silently Hiding Content from Google?
A single unhandled API timeout, dynamic link trap, or DOM hydration mismatch can quietly drop your high-value pages out of Google’s index, wasting your development efforts and shrinking your organic revenue.
If your website recently migrated to a modern framework or if Google Search Console is throwing rendering and indexing errors, don’t let dynamic code ruin your search visibility contact me directly for a JavaScript & Rendering Audit to identify hidden DOM leaks, script timeouts, and rendering delays. Also you may explore my Technical SEO Services & Website SEO Audit Services.
Frequently Asked Questions About JavaScript SEO
How to make JavaScript website completely SEO-friendly?
To make a JavaScript-powered website SEO-friendly, ensure your core architectural fundamentals follow these key rules:
- Render Critical HTML on the Server: Use Server-Side Rendering (SSR) or Static Site Generation (SSG) so Googlebot receives fully compiled text, titles, and meta tags in the initial raw HTTP payload.
- Use Native HTML Links: Wrap all internal navigation links inside standard
<a href="/target-page">elements rather than relying on custom JavaScript click handlers oronClickbutton events. - Maintain DOM Parity: Avoid contradictory metadata or
noindexdirectives between your raw server code and your client-rendered DOM. - Expose Crawlable Content: Ensure all images, text nodes, and paginated content rely on standard browser APIs (like native
loading="lazy"orIntersectionObserver) rather than manual user interaction triggers.
Q2: Can I inject primary SEO tags via Google Tag Manager (GTM)?
No, you should never rely on GTM for critical indexation tags. While Googlebot can execute GTM container scripts during its rendering pass, Tag Manager containers fire late in the DOM assembly lifecycle. If Googlebot hits a rendering resource limit or deferral queue, it may index the raw page before GTM executes, leading to missing titles, incorrect canonical tags, or ignored robots directives. Always serve primary SEO directives directly in the initial HTML or via server-rendered framework head managers.
Does Googlebot scroll down a dynamic page to trigger lazy-loaded JavaScript content?
No. Googlebot’s Web Rendering Service (WRS) opens your webpage in a headless browser viewport with a fixed vertical height, but it does not physically scroll down your page or trigger touch/hover listeners. If your lazy-loading scripts require user scrolling (window.addEventListener('scroll')) to fetch additional text or image blocks, Googlebot will never discover or index that content. Always use native HTML lazy loading (loading="lazy") or the IntersectionObserver API.
Q4: How long does Googlebot wait for client-side API or AJAX calls to load content?
While Google does not publish a strict public millisecond threshold, empirical testing shows that Googlebot’s rendering engine typically waits around 5 seconds for external API calls and JavaScript assets to resolve. If your client-side framework takes longer than 5 seconds to fetch database items via API, Googlebot will capture a snapshot of your layout in its incomplete state—leading to blank content indexation or Soft 404 flags.
Q5: How can I verify what content Googlebot actually rendered on my page?
The only definitive way to check Googlebot’s rendered snapshot is through Google Search Console:
- Run a URL Inspection on the page and click Test Live URL.
- Open the Screenshot tab to confirm whether key visual blocks and text loaded properly.
- Check the HTML tab to verify that target keywords, dynamic canonical tags, and internal
<a>links exist inside the rendered DOM code pane.
Explore Other Articles Under Technical SEO Side
Pillar Blogs
What is Technical SEO? (Parent Blog)
JavaScript SEO & Rendering Guide (Child Blog)
Other Related Articles
- How Googlebot Crawls and Understands Your Website
- Crawlability vs. Indexability in SEO
- Internal Linking in SEO: Best Practices
- Indexability in SEO: How Search Engines Index Pages
- Duplicate Content and Canonical Tags in SEO
- HTTP Status Codes and Their Impact on SEO
- URL Structure: SEO-Friendly URLs and Routing
- SEO Redirects: 301, 302 and URL Migration Best Practices